Part 1 covered connecting Novell IDM to Novell Sentinel. Part 2 covered adding our own custom events to Sentinel and getting the data to appear in Sentinel. In this portion, I will cover adding taxonomy information to the custom events.
Taxonomy is a way of allowing a generic query to gather all events of a specific type (IE User Password Change or User Creation) regardless of the source application. It is very useful data to include in our Sentinel events.
In the out of the box connector, there is a file called taxonomy.map. This file contains the taxonomy information. These events can be copied directly, the eventID is in hex format in this file, similar to the LSC file. For reference information on the taxonomy values, see http://www.novell.com/developer/sentinel_taxonomy.html
In order to add the newly modified taxonomy.map file into the collector, modify the custom.js file (see Part 2 for more information) to load this file. The new version of the taxonomy.map and custom.js files both need to be uploaded to the collector and the collector manager needs to be restarted again.
Once this is done, the new custom events should have taxonomy information in them. In Part 4, adding your own custom titles to the LSC files so the data shows up wherever you like it in the Sentinel event.
Tuesday, November 30, 2010

Novell IDM Integration with Novell Sentinel - Part 2
The next piece of the puzzle is determining how to insert custom events into IDM. If you just generate an event with an event ID between 1000 and 1999 and kick it over to sentinel, it will return an error from Sentinel:
The message gives a hint where to go to remedy the problem, but getting the full customization is where I found the most problems getting good documentation. I hope I can provide something that can act as a sample to go by to accomplish the task of getting the events showing up, as well as getting the data where we need it.
The first thing to do is find the LSC files in the collector scripts. If you take the zip file for the Novell IDM collector and unzip it, you'll find 2 different LSC files dirxml.lsc and rk4idm.lsc. I decided to use the rk4idm.lsc file to hold my customizations. It is very important that you use this file as a starting point and do not modify the existing data within it, we are simply going to extend this file with additional events.
At the bottom of my file, I added a comment (#) to distinguish my custom added events and some descriptions. Since all of the events are defined using hex instead of decimal values, I put a comment with the hex value above each event line. Then, start by using a known good event from the file.
The data type letters are as follows:
Once this is complete, the file needs to be added to the collector and used. To do this, go to Event Source Management in the Sentinel Control panel, select the Collector to be modified (IDM) and click the add auxiliary file button. Select the modified version of the file (do not change the name either!) and upload it.
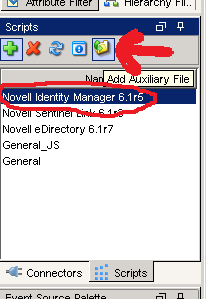
Now that we have added the modified version of the file to our Sentinel environment, we need to tell Sentinel how to load that file. To do this, we grab the custom.js file from the Sentinel SDK. We need to add a line to a spot in the file to instruct Sentinel to load the modified version of the lsc file. The default file with the one line modification (modification in bold) looks like the following:
Finally, we have our modified LSC file and the javascript file that instructs sentinel to load the file, we just need to go ahead and tell Sentinel to execute the custom.js file that we uploaded. To do this, right click on the collector, select Edit from the menu and change the Execution Mode to 'custom'.

Once this is complete, we need to restart our collector manager. The way that I normally do this is from the Sentinel Control Center, under the Admin tab, I select the Collector manager, right click on it, then select restart. You should now be able to send your new custom events over and see them in Sentinel.
The next logical progression in Part 3 will be adding taxonomy information for your newly added event.
Event Name: Collector Internal MessageWhere 3E9 is the Hex value of the eventID used in the IDM Generate-Event action.
Message: Event ID not found in LSC file: 000303E9
The message gives a hint where to go to remedy the problem, but getting the full customization is where I found the most problems getting good documentation. I hope I can provide something that can act as a sample to go by to accomplish the task of getting the events showing up, as well as getting the data where we need it.
The first thing to do is find the LSC files in the collector scripts. If you take the zip file for the Novell IDM collector and unzip it, you'll find 2 different LSC files dirxml.lsc and rk4idm.lsc. I decided to use the rk4idm.lsc file to hold my customizations. It is very important that you use this file as a starting point and do not modify the existing data within it, we are simply going to extend this file with additional events.
At the bottom of my file, I added a comment (#) to distinguish my custom added events and some descriptions. Since all of the events are defined using hex instead of decimal values, I put a comment with the hex value above each event line. Then, start by using a known good event from the file.
#1200This event is already in the file. Please note that each field is separated by a comma, and the values correspond to the fields in the paradigm that looks like the following:
000304B0,Account Create By Entitlement Grant,Driver DN,Target Account DN or Association,Entitlement,Src Identity DN or GUID,Detail,IDM EventID,Status,N,,,Version,N,,,XML Document,S,Status $ST:$SB object:$SU level:$SY objet-type:$SS event-id:$SF from $iR
#EventID,Description,Originator Title,Target Title,Subtarget Title,Text1 Title,Text2 Title,Text3 Title,Value1 Title,Value1 Type,Value2 Title,Value2 Type,Value3 Title,Value3 Type,Group Title,Group Type,Data Title,Data Type,Display SchemaThese fields should line up one to one. Please also note, the text in each field is very important, they are referenced by a javascript file (will go over this later). For now, copy the event, change the first two values (eventID and Description fields) to the hex value of the IDM event and whatever description you want to hold. The Display Schema field (the last field) has references that start with $'s. There are two tables at the top that can be referenced to see what those construct. After the $ symbol, the first letter designates the data type and the second letter designates the data field.
The data type letters are as follows:
# Format (F):The data field letters are as follows:
# T - Time (UTC localized)
# D - Date (UTC localized)
# N - Number (32bit unsigned)
# N - Number (32bit signed)
# S - String
# X - Hexdecimal Number
# R - RFC822 format date/time
# I - IPv4 Internet Address (network order)
# i - IPv4 Internet Address (host order)
# B - Boolean (Yes/No)
# b - Boolean (True/False)
# Value (V):The display schema field can have any combination of text and the tokens for the fields above. Re-use different values from other events to parse similar data types. Please keep in mind, the text value for the field (for example, Driver DN in our sample message) is specific to that field. So a value for Text 1 Title will probably not work for Numerical Value 1 field.
# R - Source IP Address
# C - Platform Agent Date
# A - Audit Service Date
# B - Originator
# H - Originator Type
# U - Target
# V - Target Type
# Y - SubTarget
# 1 - Numerical value 1
# 2 - Numerical value 2
# 3 - Numerical value 3
# S - Text 1
# T - Text 2
# F - Text 3
# O - Component
# G - Group ID
# I - Event ID
# L - Log Level
# M - MIME Hint
# X - Data Size
# D - Data
Once this is complete, the file needs to be added to the collector and used. To do this, go to Event Source Management in the Sentinel Control panel, select the Collector to be modified (IDM) and click the add auxiliary file button. Select the modified version of the file (do not change the name either!) and upload it.
Now that we have added the modified version of the file to our Sentinel environment, we need to tell Sentinel how to load that file. To do this, we grab the custom.js file from the Sentinel SDK. We need to add a line to a spot in the file to instruct Sentinel to load the modified version of the lsc file. The default file with the one line modification (modification in bold) looks like the following:
// Javascript Collector Template 6.1This file also needs to be added to the specific collector in the same method as the lsc file.
// Developed by Novell Engineering
/**
* @fileoverview
* This file is used to create additional custom parsing methods for a Collector.
* These methods can be used to modify the initialization and parsing of the released
* Collector, to provide for local customization of operation.
* <p>To use:
* <ol>
* <li>Edit this file to define your custom initialization and parsing</li>
* <li>Run the 'ant build-custom' target to create the build version of this file</li>
* <li>Place the //content/build/${name}/custom/${name}.js file in:<br/>
* ESEC_HOME/data/collector_mgr.cache/collector_common<br/>
* ESEC_HOME/data/control_center.cache/collector_common<br/>
* (you may need to create these directories on each host where the Collector will run/debug)
* <li>Change the "Execution Mode" parameter for the Collector to "custom"
* <li>Restart the Collector
* </ul>
*/
/**
* This method is used to provide locally-defined custom initialization of the Collector.
* <p>Useful variables:
* <dl>
* <dt>instance.CONFIG.collDir</dt><dd>The directory that will contain all the Collector plugin files</dd>
* <dt>this.CONFIG.commonDir</dt><dd>The directory where this custom code resides - you can add additional files as necessary</dd>
* </dl>
* @return {Boolean} Result
*/
Collector.prototype.customInit = function() {
// load additional maps, parameters, etc
var file = new File(instance.CONFIG.collDir + "rk4idm.lsc");
return true;
}
/**
* This method is used to provide locally-defined custom pre-parsing of the input record.
* You might use this method if something in your environment modifies the normal input format,
* for example if the event is tunneled through some other protocol, you might strip off
* any additional headers that were added.
* @param {Object} e The output event
*/
Record.prototype.customPreparse = function(e) {
return true;
}
/**
* This method is used to provide locally-defined custom parsing of the input record.
* NOTE: There are two types of modifications that are typically peformed:
* <ul>
* <li>Modifications to the output of existing event fields: in this case, you may need to
* debug the Collector to determine which Record attribute is used to hold the data, and then
* perform your custom transformation on that data. For example:<br/>
* <pre>
* // Main code sets rec.evt to raw event name from device, but these overlap with
* // event names from other devices in our environment so are hard to distinguish.
* // We will add a prefix to help identify the events
* this.evt = "FW: " + this.evt;
* </pre></li>
* <li>Additional custom parsing that pulls more specific pieces of information out of the event,
* for example if a free-text field contains some info that you want to use to categorize events
* in your environment. In this scenario, you should:
* <ul>
* <li>Only use CustomerVars to hold the parsed-out data</li>
* <li>You will need to manipulate the Event object directly, as new additions to the Record object
* will be lost. The 'e' variable is used to access the Event object.</li>
* </ul>
* Use the 'CustomerVar1' through 'CustomerVar300' to hold your data. Refer to the documentation
* for the datatypes of those variables.
* <pre>
* // Want to extract the Department name that is injected into the "message" field
* e.CustomerVar21 = rec.message.substr(12,34);
* </pre>
* @param {Object} e The output event
*/
Record.prototype.customParse = function(e) {
return true;
}
Finally, we have our modified LSC file and the javascript file that instructs sentinel to load the file, we just need to go ahead and tell Sentinel to execute the custom.js file that we uploaded. To do this, right click on the collector, select Edit from the menu and change the Execution Mode to 'custom'.
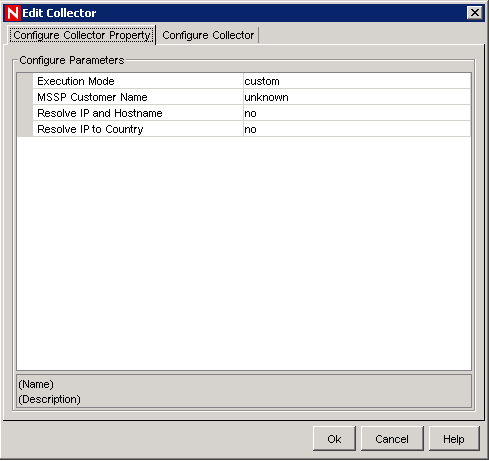
Once this is complete, we need to restart our collector manager. The way that I normally do this is from the Sentinel Control Center, under the Admin tab, I select the Collector manager, right click on it, then select restart. You should now be able to send your new custom events over and see them in Sentinel.
The next logical progression in Part 3 will be adding taxonomy information for your newly added event.
Novell IDM Integration with Novell Sentinel - Part 1
A few hundred Novell IDM drivers and a fully functional SIEM system (Sentinel). Why not kick over events from IDM to Sentinel? That part wasn't too bad, there is a collector specifically for Novell IDM that will kick a whole slew of events. Here is the monkey wrench, what if you want to leverage IDM to send custom events to Sentinel?
Let me begin from the start. In most instances, I find Novell's documentation to be much better than other vendors, but the Sentinel documentation doesn't seem to live up to the standards in which I have become accustomed. I had quite a bit of confusion as to the Platform Agent installation and configuration in order to get events successfully sent over to IDM. After much tedious research, I found that IDM automatically installs a version of the platform agent, so no additional Novell Audit installations are required.
As for configuration, it proved to be very straight forward, simply modify the C:\Windows\logevent.cfg file (please note, my customer environment is a pure windows shop, so tweaks will have to be made for suse and other OS's). The good part about this config file is there are comments explaining all of the different settings, mine looked like the following:
Where 10.1.1.1 is the IP address the Sentinel Collector Manager server is listening on for Novell IDM Audit events. This file should be setup for all Identity Vault servers to ensure all messages are sent to Sentinel.
The next thing to do is instruct IDM which events to kick out. In designer, go to the properties of the driverset which you would like to forward logs to Sentinel. On the Log Level portion, select which types of logs.

I would recommend selecting the "Log specific events" radio button, then selecting events from the list. Please note that the "Other" under "Status Events" will be used later. This will allow events created with the "generate-event" action in IDM to be shown within Sentinel.

Once all of the events are selected on the driverset and the logevent.cfg file is updated, you will need to bounce edirectory entirely for them to take effect. There may be a way to do it otherwise, but this was the easiest way to make it all take effect. Also note that this must be done on all servers in the driverset.
Now, the events will be sent to that IP address, but you may not have a collector manager listening on that port. Everything as far as setting up the Novell IDM collector is pretty straight forward. There is one thing to note as it may become an issue. In logevent.cfg we did not specify the port explicitly, therefore the audit events will be sent on the default port of 289. Please note that if the Collector Manager is installed on a Linux/Unix machine, the process must run as root to listen on any port below 1024. That being said, if Collector Managers are on Unix/Linux, I would recommend using port 1289, this will need to be defined in logevent.cfg as well as configured on the Sentinel environment.
Let me begin from the start. In most instances, I find Novell's documentation to be much better than other vendors, but the Sentinel documentation doesn't seem to live up to the standards in which I have become accustomed. I had quite a bit of confusion as to the Platform Agent installation and configuration in order to get events successfully sent over to IDM. After much tedious research, I found that IDM automatically installs a version of the platform agent, so no additional Novell Audit installations are required.
As for configuration, it proved to be very straight forward, simply modify the C:\Windows\logevent.cfg file (please note, my customer environment is a pure windows shop, so tweaks will have to be made for suse and other OS's). The good part about this config file is there are comments explaining all of the different settings, mine looked like the following:
LogHost=10.1.1.1
LogReconnectInterval=30
Where 10.1.1.1 is the IP address the Sentinel Collector Manager server is listening on for Novell IDM Audit events. This file should be setup for all Identity Vault servers to ensure all messages are sent to Sentinel.
The next thing to do is instruct IDM which events to kick out. In designer, go to the properties of the driverset which you would like to forward logs to Sentinel. On the Log Level portion, select which types of logs.

I would recommend selecting the "Log specific events" radio button, then selecting events from the list. Please note that the "Other" under "Status Events" will be used later. This will allow events created with the "generate-event" action in IDM to be shown within Sentinel.

Once all of the events are selected on the driverset and the logevent.cfg file is updated, you will need to bounce edirectory entirely for them to take effect. There may be a way to do it otherwise, but this was the easiest way to make it all take effect. Also note that this must be done on all servers in the driverset.
Now, the events will be sent to that IP address, but you may not have a collector manager listening on that port. Everything as far as setting up the Novell IDM collector is pretty straight forward. There is one thing to note as it may become an issue. In logevent.cfg we did not specify the port explicitly, therefore the audit events will be sent on the default port of 289. Please note that if the Collector Manager is installed on a Linux/Unix machine, the process must run as root to listen on any port below 1024. That being said, if Collector Managers are on Unix/Linux, I would recommend using port 1289, this will need to be defined in logevent.cfg as well as configured on the Sentinel environment.
Wednesday, October 27, 2010
ColdFusion 9 init script
Cloud migration is happening at GCA! Very exciting stuff. The cloud is great, we will no longer have to manage our own hardware, worry about the power situation, backup battery, snapshots, maintenance crap, or anything else associated with hosting our own websites.
The fun part of the whole thing is rebuilding the coldfusion stuff up in the cloud. Not a big deal, been there done that. The only quirk to the whole thing about building a Coldfusion 9 webserver on Ubuntu 10.04 LTS is that it does not have a valid startup script, so I created my own. Its nothing fancy, but gets the job done. Enjoy
The fun part of the whole thing is rebuilding the coldfusion stuff up in the cloud. Not a big deal, been there done that. The only quirk to the whole thing about building a Coldfusion 9 webserver on Ubuntu 10.04 LTS is that it does not have a valid startup script, so I created my own. Its nothing fancy, but gets the job done. Enjoy
#! /bin/sh
case "$1" in
start)
echo "Starting ColdFusion9" >&2
/opt/coldfusion9/bin/coldfusion start
exit 3
;;
restart)
echo "Restarting ColdFusion9" >&2
/opt/coldfusion9/bin/coldfusion restart
exit 3
;;
stop)
echo "Stopping ColdFusion9" >&2
/opt/coldfusion9/bin/coldfusion stop
exit 3
;;
*)
echo "Usage: $0 start|stop|restart" >&2
exit 3
;;
esac
:
Tuesday, August 31, 2010
ECMAScript to run a command on windows
I had the need to try to run a batch script on the command line using Novell IDM. I was able to develop a quick function in ECMAScript in order to accomplish this task. Simply call the following function from policy and pass it the full string of what you want run on the command line and it'll return any output it may return. Very simple, yet infinitely useful.
importPackage(Packages.java.io);
importPackage(Packages.java.util);
function runCommand(commandString)
{
var runtime = new java.lang.Runtime.getRuntime();
var process = runtime.exec(commandString);
var is = process.getInputStream();
var isr = new Packages.java.io.InputStreamReader(is);
var br = new Packages.java.io.BufferedReader(isr);
var line = new java.lang.String();
var fulltext = new java.lang.String();
while ((line = br.readLine()) != null )
{
fulltext = fulltext + line;
}
return fulltext;
}
Wednesday, June 2, 2010
Performance Tuning eDirectory
I have a particular eDirectory server that is one beefy sucker. This server is running Windows Server 2008 64bit with a whopping 32GB of memory. It's running 64bit eDirectory and the DIBFiles directory is about 1.2GB in size. I was looking at this box, which was only using about 500MB of memory. While the box is not struggling whatsoever, I was thinking, with 32GB of memory, why not start using some of that to jack up the performance as much as possible.
The first thing I did was max out the Java Heap Size for IDM (see yesterdays blog post) to 2GB (maximum for 32bit java). If, for whatever reason, the box actually uses all of this memory in the heap, I'll still have at least 28GB of memory left over. Why not just throw the entire directory into cache so that it performs wicked fast. I searched around on the Google debugger until I found an article by Novell on performance tuning with eDirectory. In this article I found some information on how to change the cache settings. There is a file (C:\Novell\NDS\DIBFiles\_ndsdb.ini on windows) that has memory settings. I made a quick change, then bounced eDirectory, and now my box will use up to 75% available memory for eDirectory cache.
The file before changes looked like this:
preallocatecache=true
cache=200000000
After my changes:
preallocatecache=true
cache=HARD, %:75, MIN:200000000
It took a while for it to use the cache, but after about 24 hours, dhost.exe is using up just over 3GB of memory instead of the 500MB it had accumulated over the period of a couple months.
For reference, the eDirectory performance tuning article was located here: http://www.novell.com/documentation/edir88/pdfdoc/edir88tuning/edir88tuning.pdf
The first thing I did was max out the Java Heap Size for IDM (see yesterdays blog post) to 2GB (maximum for 32bit java). If, for whatever reason, the box actually uses all of this memory in the heap, I'll still have at least 28GB of memory left over. Why not just throw the entire directory into cache so that it performs wicked fast. I searched around on the Google debugger until I found an article by Novell on performance tuning with eDirectory. In this article I found some information on how to change the cache settings. There is a file (C:\Novell\NDS\DIBFiles\_ndsdb.ini on windows) that has memory settings. I made a quick change, then bounced eDirectory, and now my box will use up to 75% available memory for eDirectory cache.
The file before changes looked like this:
preallocatecache=true
cache=200000000
After my changes:
preallocatecache=true
cache=HARD, %:75, MIN:200000000
It took a while for it to use the cache, but after about 24 hours, dhost.exe is using up just over 3GB of memory instead of the 500MB it had accumulated over the period of a couple months.
For reference, the eDirectory performance tuning article was located here: http://www.novell.com/documentation/edir88/pdfdoc/edir88tuning/edir88tuning.pdf
Tuesday, June 1, 2010
Performance Tuning Novell IDM
Working with IDM in a large environment. I needed to tune some memory parameters on IDM because I was getting Out of Memory errors on my JDBC drivers. The errors looked like the following:
I was able to tweak with these settings straight from Designer, but could also use iManager. For iManager, you simply go to Identity Manager Overview, then select Driverset properties once you are looking at the driverset. In the properties, it is under the Identity Management tab, Misc section (see screenshot below).

For designer, you simply go to the properties of the driverset object, select java and set your environment for the heap there (see below).

As you can tell, the values are the same (as they should be). I set it to 640MB, which is fairly high, but I will be running many JDBC drivers in this driverset on this server, so I will use that memory. The default value is 64MB, and it is recommended to increase this in increments of 64-128MB at a time. In order for these settings to take effect, eDirectory must be restarted. Please note, this setting is on a per server basis and must be tweaked as such.
There is the potential to set this value too high. One symptom that you will observe if this value is set too high is the dhost.exe process will consume a very small amount of memory relative to the previous it was using and your IDM drivers do not start at all. This is a hint that you have set the value too high and need to set it lower.
If you are using a tree that only has one server and you hose this up, it is possible that eDirectory will not even start. This becomes problematic because you need eDirectory started in order to change this setting. To resolve your problem, you can prevent the DirXML portion of the eDirectory stack from starting by renaming the following file and starting eDirectory. At this point you should be able to change the cache value and move on:
C:\Novell\NDS\dirxmllib.dll
DirXML Log Event -------------------
Driver: \VAULT\ORG\ESC\DirXML\DRIVERSET\HMS S00177
Channel: Publisher
Status: Error
Message: Code(-9010) An exception occurred: java.lang.OutOfMemoryError: Java heap space
at java.util.Arrays.copyOf(Arrays.java:2786)
at java.io.ByteArrayOutputStream.write(ByteArrayOutputStream.java:94)
at sun.nio.cs.StreamEncoder.writeBytes(StreamEncoder.java:202)
at sun.nio.cs.StreamEncoder.implFlushBuffer(StreamEncoder.java:272)
at sun.nio.cs.StreamEncoder.implFlush(StreamEncoder.java:276)
at sun.nio.cs.StreamEncoder.flush(StreamEncoder.java:122)
at java.io.OutputStreamWriter.flush(OutputStreamWriter.java:212)
at java.io.BufferedWriter.flush(BufferedWriter.java:236)
at java.io.PrintWriter.flush(PrintWriter.java:276)
at com.novell.nds.dirxml.driver.jdbc.util.JDBCLib.GetStackTrace(Unknown Source)
at com.novell.nds.dirxml.driver.jdbc.util.JDBCLib.UnhandledException(Unknown Source)
at com.novell.nds.dirxml.driver.jdbc.JDBCPublicationShim.start(Unknown Source)
at com.novell.nds.dirxml.driver.jdbc.JDBCPublicationProxy.start(Unknown Source)
at com.novell.nds.dirxml.engine.Publisher.run(Publisher.java:420)
at java.lang.Thread.run(Thread.java:619)
I was able to tweak with these settings straight from Designer, but could also use iManager. For iManager, you simply go to Identity Manager Overview, then select Driverset properties once you are looking at the driverset. In the properties, it is under the Identity Management tab, Misc section (see screenshot below).

For designer, you simply go to the properties of the driverset object, select java and set your environment for the heap there (see below).

As you can tell, the values are the same (as they should be). I set it to 640MB, which is fairly high, but I will be running many JDBC drivers in this driverset on this server, so I will use that memory. The default value is 64MB, and it is recommended to increase this in increments of 64-128MB at a time. In order for these settings to take effect, eDirectory must be restarted. Please note, this setting is on a per server basis and must be tweaked as such.
There is the potential to set this value too high. One symptom that you will observe if this value is set too high is the dhost.exe process will consume a very small amount of memory relative to the previous it was using and your IDM drivers do not start at all. This is a hint that you have set the value too high and need to set it lower.
If you are using a tree that only has one server and you hose this up, it is possible that eDirectory will not even start. This becomes problematic because you need eDirectory started in order to change this setting. To resolve your problem, you can prevent the DirXML portion of the eDirectory stack from starting by renaming the following file and starting eDirectory. At this point you should be able to change the cache value and move on:
C:\Novell\NDS\dirxmllib.dll
Subscribe to:
Posts (Atom)