Event Name: Collector Internal MessageWhere 3E9 is the Hex value of the eventID used in the IDM Generate-Event action.
Message: Event ID not found in LSC file: 000303E9
The message gives a hint where to go to remedy the problem, but getting the full customization is where I found the most problems getting good documentation. I hope I can provide something that can act as a sample to go by to accomplish the task of getting the events showing up, as well as getting the data where we need it.
The first thing to do is find the LSC files in the collector scripts. If you take the zip file for the Novell IDM collector and unzip it, you'll find 2 different LSC files dirxml.lsc and rk4idm.lsc. I decided to use the rk4idm.lsc file to hold my customizations. It is very important that you use this file as a starting point and do not modify the existing data within it, we are simply going to extend this file with additional events.
At the bottom of my file, I added a comment (#) to distinguish my custom added events and some descriptions. Since all of the events are defined using hex instead of decimal values, I put a comment with the hex value above each event line. Then, start by using a known good event from the file.
#1200This event is already in the file. Please note that each field is separated by a comma, and the values correspond to the fields in the paradigm that looks like the following:
000304B0,Account Create By Entitlement Grant,Driver DN,Target Account DN or Association,Entitlement,Src Identity DN or GUID,Detail,IDM EventID,Status,N,,,Version,N,,,XML Document,S,Status $ST:$SB object:$SU level:$SY objet-type:$SS event-id:$SF from $iR
#EventID,Description,Originator Title,Target Title,Subtarget Title,Text1 Title,Text2 Title,Text3 Title,Value1 Title,Value1 Type,Value2 Title,Value2 Type,Value3 Title,Value3 Type,Group Title,Group Type,Data Title,Data Type,Display SchemaThese fields should line up one to one. Please also note, the text in each field is very important, they are referenced by a javascript file (will go over this later). For now, copy the event, change the first two values (eventID and Description fields) to the hex value of the IDM event and whatever description you want to hold. The Display Schema field (the last field) has references that start with $'s. There are two tables at the top that can be referenced to see what those construct. After the $ symbol, the first letter designates the data type and the second letter designates the data field.
The data type letters are as follows:
# Format (F):The data field letters are as follows:
# T - Time (UTC localized)
# D - Date (UTC localized)
# N - Number (32bit unsigned)
# N - Number (32bit signed)
# S - String
# X - Hexdecimal Number
# R - RFC822 format date/time
# I - IPv4 Internet Address (network order)
# i - IPv4 Internet Address (host order)
# B - Boolean (Yes/No)
# b - Boolean (True/False)
# Value (V):The display schema field can have any combination of text and the tokens for the fields above. Re-use different values from other events to parse similar data types. Please keep in mind, the text value for the field (for example, Driver DN in our sample message) is specific to that field. So a value for Text 1 Title will probably not work for Numerical Value 1 field.
# R - Source IP Address
# C - Platform Agent Date
# A - Audit Service Date
# B - Originator
# H - Originator Type
# U - Target
# V - Target Type
# Y - SubTarget
# 1 - Numerical value 1
# 2 - Numerical value 2
# 3 - Numerical value 3
# S - Text 1
# T - Text 2
# F - Text 3
# O - Component
# G - Group ID
# I - Event ID
# L - Log Level
# M - MIME Hint
# X - Data Size
# D - Data
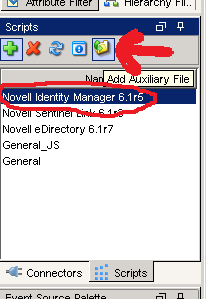
Once this is complete, the file needs to be added to the collector and used. To do this, go to Event Source Management in the Sentinel Control panel, select the Collector to be modified (IDM) and click the add auxiliary file button. Select the modified version of the file (do not change the name either!) and upload it.
Now that we have added the modified version of the file to our Sentinel environment, we need to tell Sentinel how to load that file. To do this, we grab the custom.js file from the Sentinel SDK. We need to add a line to a spot in the file to instruct Sentinel to load the modified version of the lsc file. The default file with the one line modification (modification in bold) looks like the following:
// Javascript Collector Template 6.1This file also needs to be added to the specific collector in the same method as the lsc file.
// Developed by Novell Engineering
/**
* @fileoverview
* This file is used to create additional custom parsing methods for a Collector.
* These methods can be used to modify the initialization and parsing of the released
* Collector, to provide for local customization of operation.
* <p>To use:
* <ol>
* <li>Edit this file to define your custom initialization and parsing</li>
* <li>Run the 'ant build-custom' target to create the build version of this file</li>
* <li>Place the //content/build/${name}/custom/${name}.js file in:<br/>
* ESEC_HOME/data/collector_mgr.cache/collector_common<br/>
* ESEC_HOME/data/control_center.cache/collector_common<br/>
* (you may need to create these directories on each host where the Collector will run/debug)
* <li>Change the "Execution Mode" parameter for the Collector to "custom"
* <li>Restart the Collector
* </ul>
*/
/**
* This method is used to provide locally-defined custom initialization of the Collector.
* <p>Useful variables:
* <dl>
* <dt>instance.CONFIG.collDir</dt><dd>The directory that will contain all the Collector plugin files</dd>
* <dt>this.CONFIG.commonDir</dt><dd>The directory where this custom code resides - you can add additional files as necessary</dd>
* </dl>
* @return {Boolean} Result
*/
Collector.prototype.customInit = function() {
// load additional maps, parameters, etc
var file = new File(instance.CONFIG.collDir + "rk4idm.lsc");
return true;
}
/**
* This method is used to provide locally-defined custom pre-parsing of the input record.
* You might use this method if something in your environment modifies the normal input format,
* for example if the event is tunneled through some other protocol, you might strip off
* any additional headers that were added.
* @param {Object} e The output event
*/
Record.prototype.customPreparse = function(e) {
return true;
}
/**
* This method is used to provide locally-defined custom parsing of the input record.
* NOTE: There are two types of modifications that are typically peformed:
* <ul>
* <li>Modifications to the output of existing event fields: in this case, you may need to
* debug the Collector to determine which Record attribute is used to hold the data, and then
* perform your custom transformation on that data. For example:<br/>
* <pre>
* // Main code sets rec.evt to raw event name from device, but these overlap with
* // event names from other devices in our environment so are hard to distinguish.
* // We will add a prefix to help identify the events
* this.evt = "FW: " + this.evt;
* </pre></li>
* <li>Additional custom parsing that pulls more specific pieces of information out of the event,
* for example if a free-text field contains some info that you want to use to categorize events
* in your environment. In this scenario, you should:
* <ul>
* <li>Only use CustomerVars to hold the parsed-out data</li>
* <li>You will need to manipulate the Event object directly, as new additions to the Record object
* will be lost. The 'e' variable is used to access the Event object.</li>
* </ul>
* Use the 'CustomerVar1' through 'CustomerVar300' to hold your data. Refer to the documentation
* for the datatypes of those variables.
* <pre>
* // Want to extract the Department name that is injected into the "message" field
* e.CustomerVar21 = rec.message.substr(12,34);
* </pre>
* @param {Object} e The output event
*/
Record.prototype.customParse = function(e) {
return true;
}
Finally, we have our modified LSC file and the javascript file that instructs sentinel to load the file, we just need to go ahead and tell Sentinel to execute the custom.js file that we uploaded. To do this, right click on the collector, select Edit from the menu and change the Execution Mode to 'custom'.
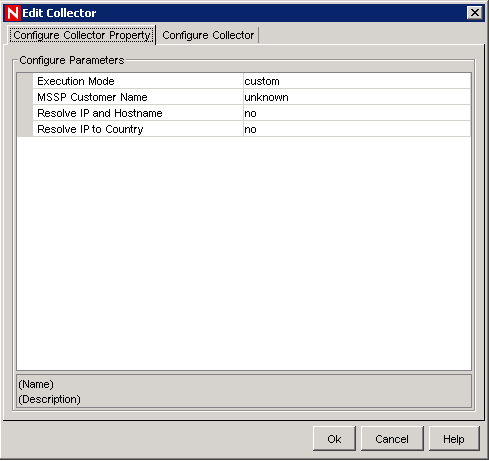
Once this is complete, we need to restart our collector manager. The way that I normally do this is from the Sentinel Control Center, under the Admin tab, I select the Collector manager, right click on it, then select restart. You should now be able to send your new custom events over and see them in Sentinel.
The next logical progression in Part 3 will be adding taxonomy information for your newly added event.
ReplyDeleteI'm really impressed with your writing skills, as smart as the structure of your weblog.
IDM Crack